


How to Adjust the Duration of an Animation Effect
Enhancing Your Design with Custom Animations
Animations play a crucial role in design, adding a touch of interactivity and visual appeal to your projects. In this article, we will explore how to effectively specify and adjust the timing of animations in your designs. By harnessing the power of timeline manipulation, you can create captivating and seamless user experiences. Let’s dive in!
Understanding Animation Timing
When it comes to animation, timing is everything. It determines the speed, duration, and overall flow of your design elements. By carefully controlling the timing, you can guide your users’ attention and create a delightful user interface. Thankfully, adjusting the timing of animations is a breeze with the right tools.
The steps are as follows:
- Select the item that you would like to animate from your canvas
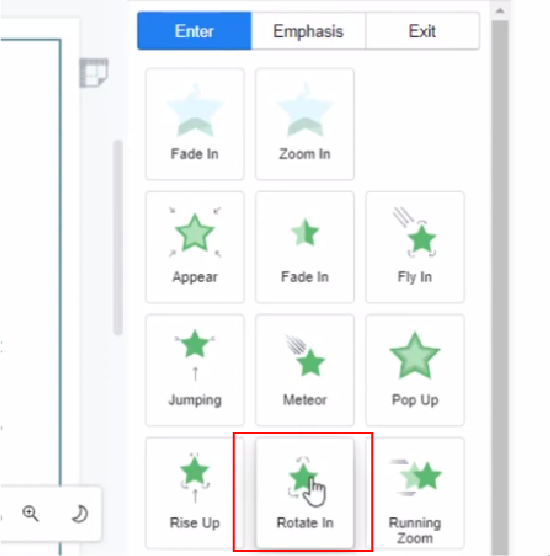
- View the “animate this object” panel and try out different kinds of animation effect

- Upon selection, you can drag the green bar as you like to adjust the animation duration
Utilizing the Animation Timeline
One powerful tool for manipulating animation timing is the animation timeline. It allows you to visualize and control the timing aspects of your animations. Here’s how you can make the most of it:
- Specify Animation: First, you need to define the animation you want to work with. Whether it’s a fade-in effect, a slide transition, or a complex motion, identify the animation you wish to adjust.
- Access the Timeline: Once you’ve specified the animation, locate the animation timeline within your design software. This timeline provides an overview of all the animations present in your project.
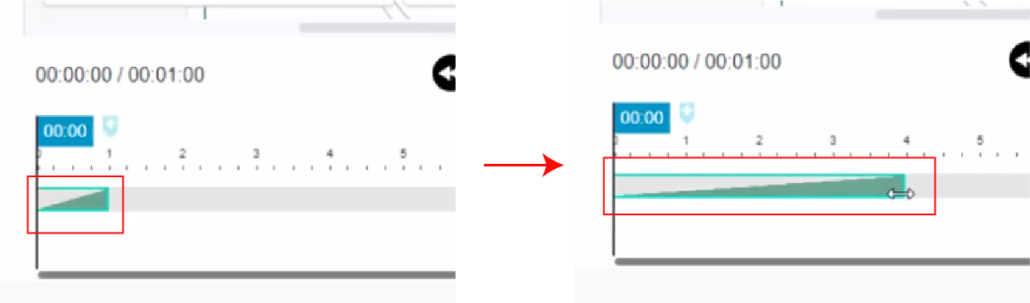
- Drag the Edge: To adjust the timing, simply click and drag the edge of the animation in the timeline. By extending or contracting the animation duration, you can control how long it takes for the animation to complete.
- Fine-Tune Timing: For more precise control, you can zoom in on the timeline to focus on specific segments of your animation. This allows you to make minute adjustments to the animation’s start and end points.
- Iterate and Experiment:** Don’t be afraid to iterate and experiment with different timing options. Play around with the animation’s duration, delays, and easing functions to find the perfect timing that enhances your design.
Animation timing is a crucial aspect of design that can greatly impact user engagement and satisfaction. By leveraging the animation timeline and applying the tips mentioned above, you can create captivating and polished animations that elevate your design to the next level. So go ahead, experiment, and breathe life into your projects with custom animations! After applying animation, you might like to adjust the timeline to get a smoother transition effect. Create animation on flipbooks easily with Visual Paradigm Online. In this video, you can see how to effectively adjust the duration of an animation effect.
This post is also available in Deutsche, Español, فارسی, Français, English, Bahasa Indonesia, 日本語, Polski, Portuguese, Ру́сский, Việt Nam, 简体中文 and 繁體中文.
