




From Big Picture to Code: A Beginner’s Guide to Visualizing Software Architecture with the C4 Model
Introduction
Software architecture documentation often feels overwhelming. Developers either create overly complex diagrams that nobody understands or skip documentation entirely, leaving teams lost in a maze of code.
Enter the C4 model—a simple, hierarchical approach to software architecture visualization created by Simon Brown. Think of it as Google Maps for your software: you start with a world view and progressively zoom in until you see individual streets and buildings.
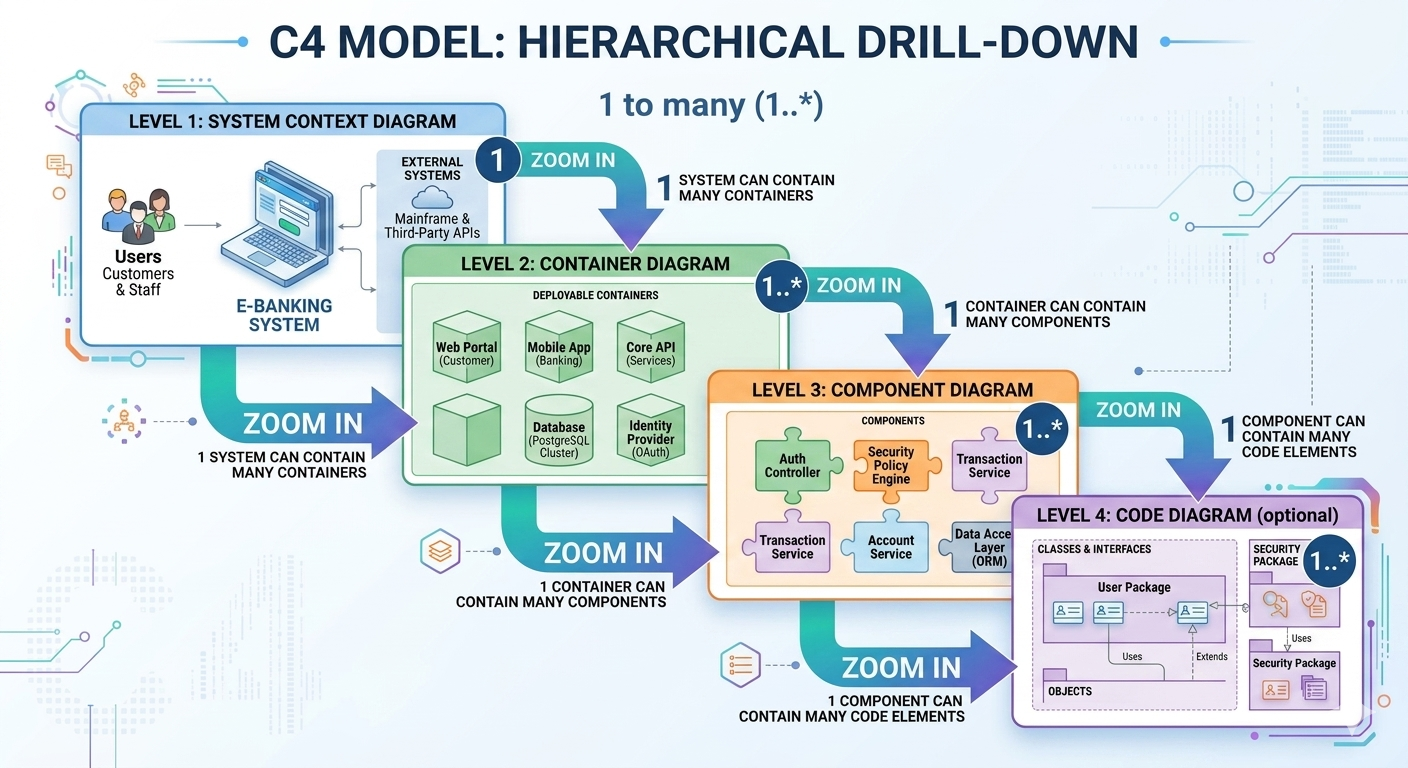
This tutorial will walk you through all four levels of the C4 model with practical examples, PlantUML code snippets, and guidance on using modern tools like Visual Paradigm to create professional architecture diagrams that actually help your team.
🎯 Understanding the C4 Model Through a Real-World Example
Let’s build documentation for “PayQuick”—a modern online payment platform that allows users to send money, pay bills, and manage cards. We’ll create diagrams for each C4 level.
🗺️ Level 1: System Context Diagram
What It Shows
The 30,000-foot view of your system in its environment.
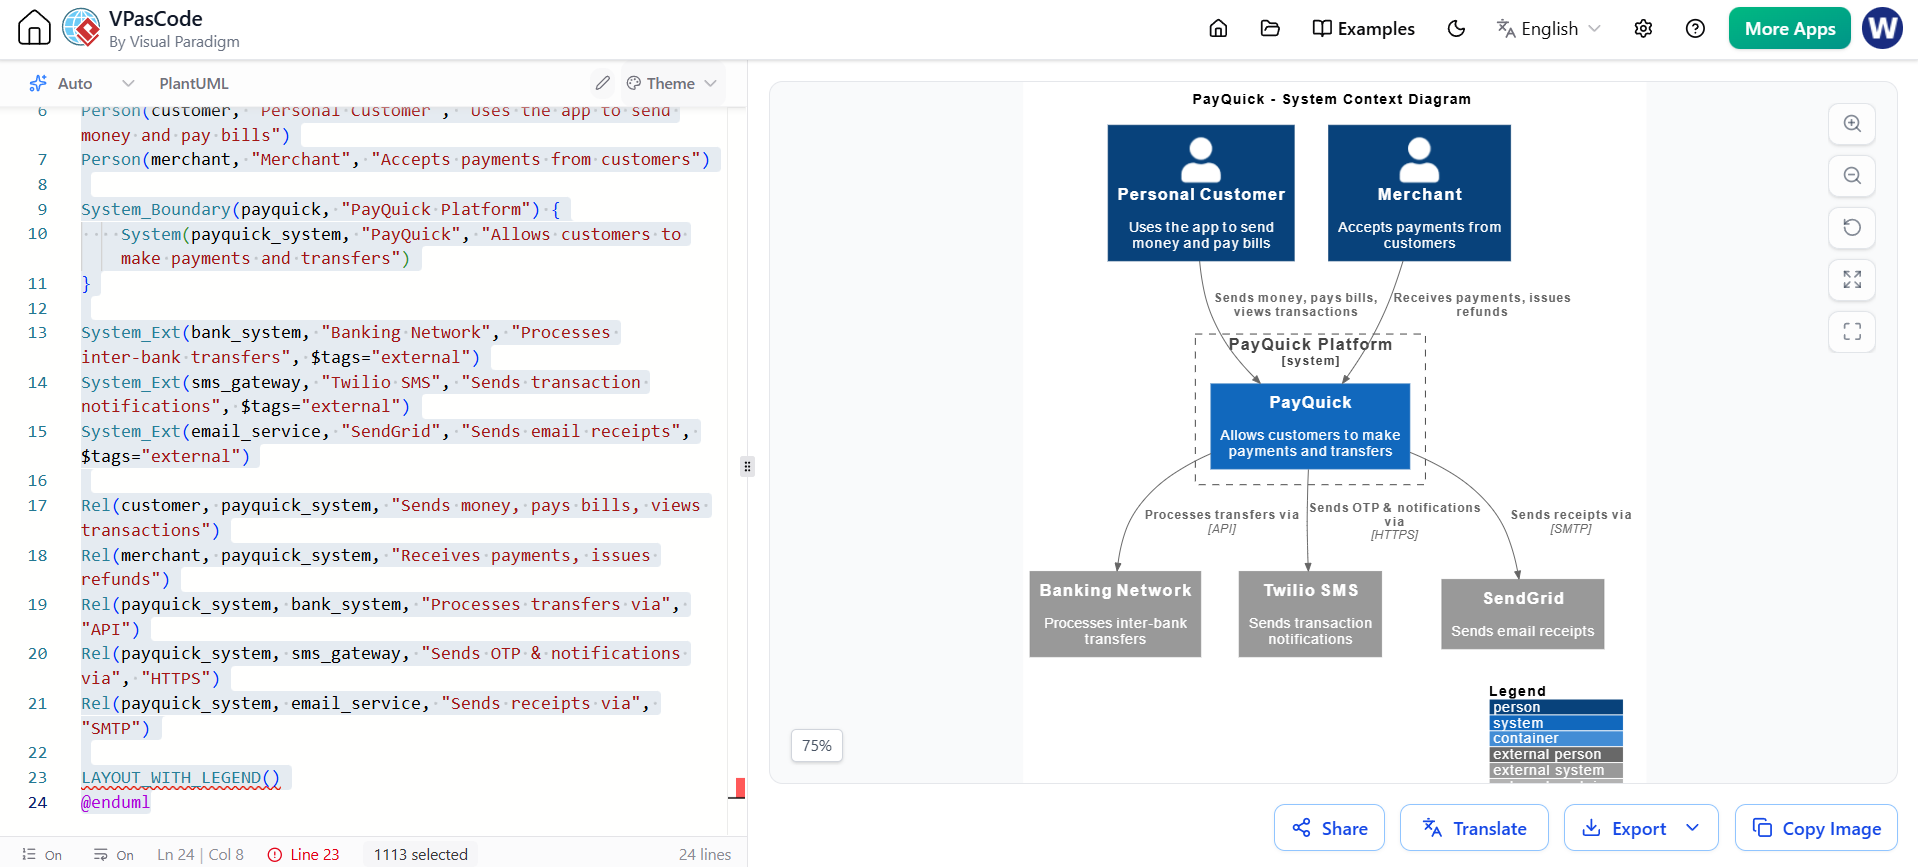
PayQuick Example
Actors:
-
Personal Customer
-
Merchant
-
Bank Systems
-
SMS Gateway
Relationships:
-
Customers send money
-
Merchants receive payments
-
System integrates with external banks
-
System sends SMS notifications
C4-PlantUML Code
@startuml
!include https://raw.githubusercontent.com/plantuml-stdlib/C4-PlantUML/master/C4_Container.puml

title PayQuick - System Context Diagram

Person(customer, "Personal Customer", "Uses the app to send money and pay bills")
Person(merchant, "Merchant", "Accepts payments from customers")

System_Boundary(payquick, "PayQuick Platform") {
    System(payquick_system, "PayQuick", "Allows customers to make payments and transfers")
}

System_Ext(bank_system, "Banking Network", "Processes inter-bank transfers", $tags="external")
System_Ext(sms_gateway, "Twilio SMS", "Sends transaction notifications", $tags="external")
System_Ext(email_service, "SendGrid", "Sends email receipts", $tags="external")

Rel(customer, payquick_system, "Sends money, pays bills, views transactions")
Rel(merchant, payquick_system, "Receives payments, issues refunds")
Rel(payquick_system, bank_system, "Processes transfers via", "API")
Rel(payquick_system, sms_gateway, "Sends OTP & notifications via", "HTTPS")
Rel(payquick_system, email_service, "Sends receipts via", "SMTP")

LAYOUT_WITH_LEGEND()
@enduml
Visual Paradigm Tip
In Visual Paradigm, use the AI Assistant to generate initial system context diagrams by describing your system in natural language: “Create a system context diagram for a payment platform with customers, merchants, and banking integrations.”
📦 Level 2: Container Diagram
What It Shows
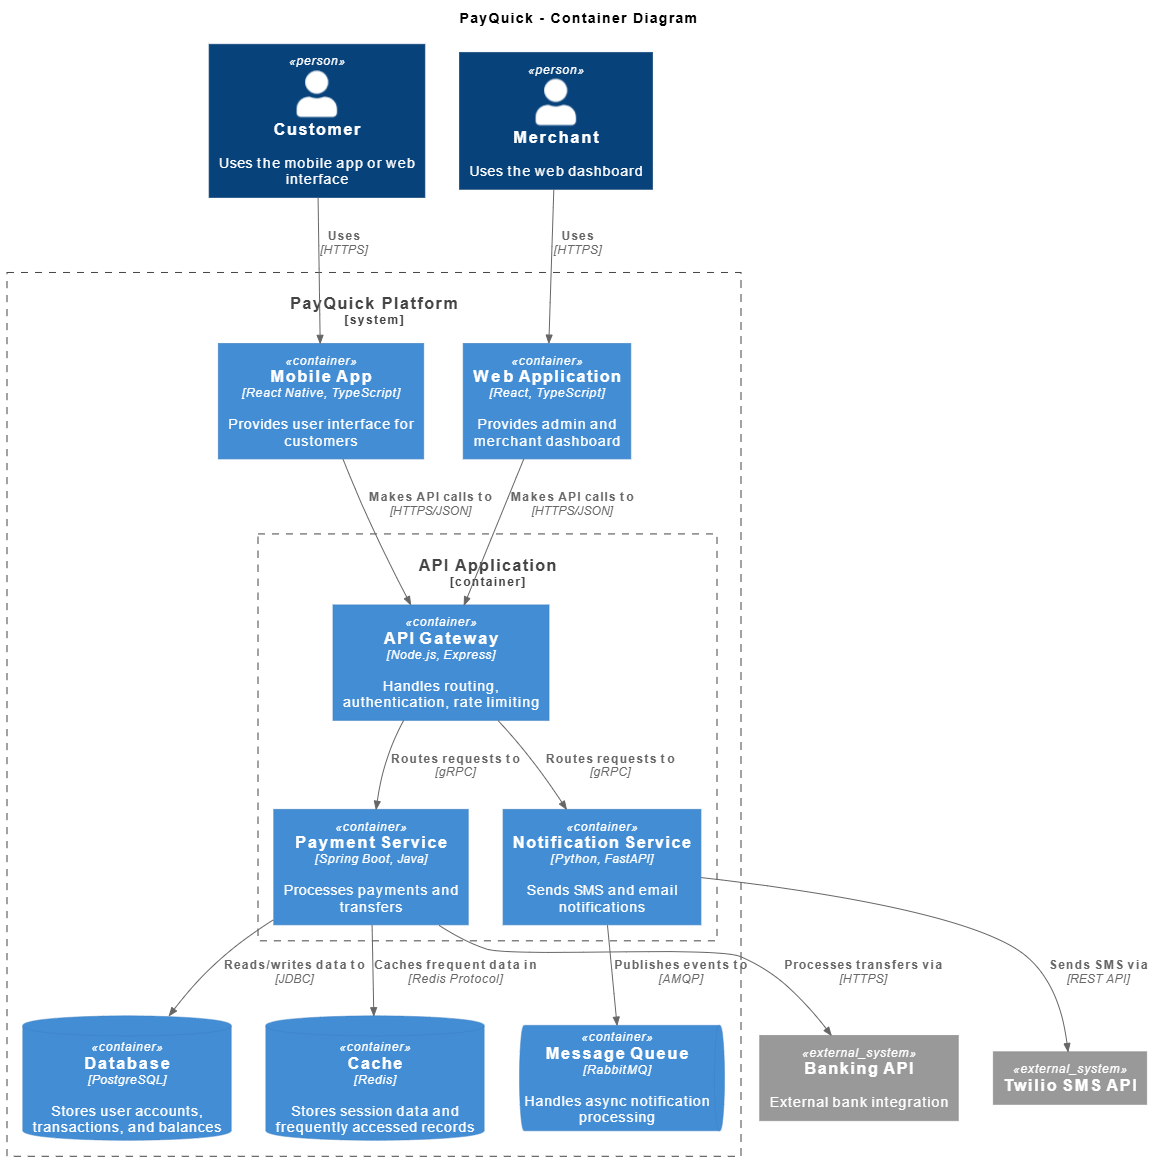
The major technology choices and how they interact.
PayQuick Example
Containers:
-
Mobile App (iOS/Android)
-
Web Application (React)
-
API Application (Spring Boot)
-
Database (PostgreSQL)
-
Message Queue (RabbitMQ)
-
Cache (Redis)
C4-PlantUML Code
@startuml
!include https://raw.githubusercontent.com/plantuml-stdlib/C4-PlantUML/master/C4_Container.puml

title PayQuick - Container Diagram

Person(customer, "Customer", "Uses the mobile app or web interface")
Person(merchant, "Merchant", "Uses the web dashboard")

System_Boundary(payquick, "PayQuick Platform") {
    Container(mobile_app, "Mobile App", "React Native, TypeScript", "Provides user interface for customers")
    Container(web_app, "Web Application", "React, TypeScript", "Provides admin and merchant dashboard")

    Container_Boundary(api, "API Application") {
        Container(api_gateway, "API Gateway", "Node.js, Express", "Handles routing, authentication, rate limiting")
        Container(payment_service, "Payment Service", "Spring Boot, Java", "Processes payments and transfers")
        Container(notification_service, "Notification Service", "Python, FastAPI", "Sends SMS and email notifications")
    }

    ContainerDb(database, "Database", "PostgreSQL", "Stores user accounts, transactions, and balances")
    ContainerDb(cache, "Cache", "Redis", "Stores session data and frequently accessed records")
    ContainerQueue(queue, "Message Queue", "RabbitMQ", "Handles async notification processing")
}

System_Ext(bank_api, "Banking API", "External bank integration")
System_Ext(sms_provider, "Twilio SMS API")

Rel(customer, mobile_app, "Uses", "HTTPS")
Rel(merchant, web_app, "Uses", "HTTPS")
Rel(mobile_app, api_gateway, "Makes API calls to", "HTTPS/JSON")
Rel(web_app, api_gateway, "Makes API calls to", "HTTPS/JSON")
Rel(api_gateway, payment_service, "Routes requests to", "gRPC")
Rel(api_gateway, notification_service, "Routes requests to", "gRPC")
Rel(payment_service, database, "Reads/writes data to", "JDBC")
Rel(payment_service, cache, "Caches frequent data in", "Redis Protocol")
Rel(notification_service, queue, "Publishes events to", "AMQP")
Rel(notification_service, sms_provider, "Sends SMS via", "REST API")
Rel(payment_service, bank_api, "Processes transfers via", "HTTPS")
@enduml
Visual Paradigm AI Feature
Use Smart Connector with AI suggestions to automatically detect and suggest relationships between containers based on their types and responsibilities.
Level 3: Component Diagram
What It Shows
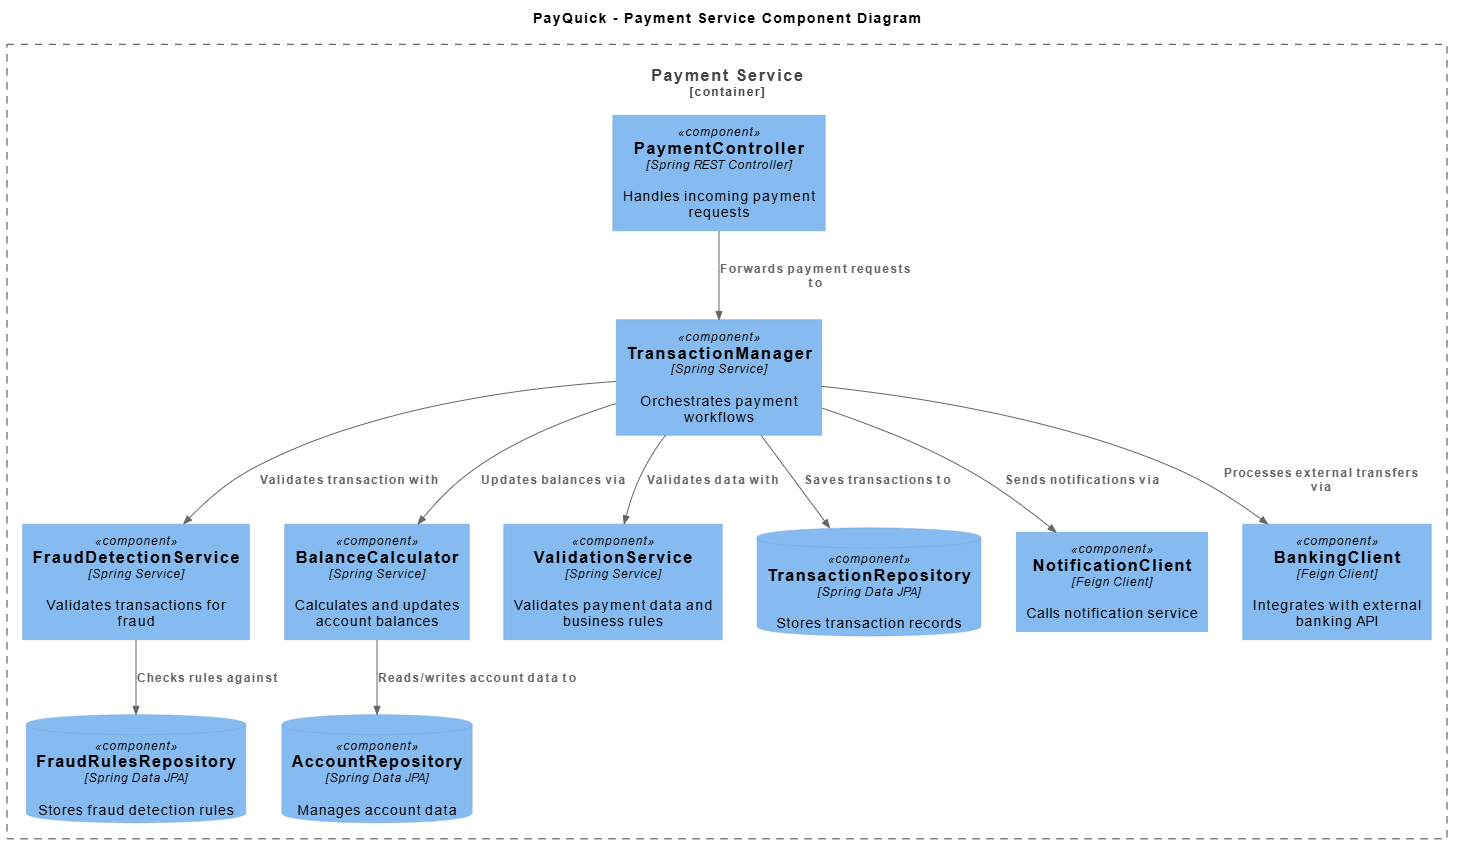
The internal structure of a single container.
PayQuick Example
Let’s zoom into the Payment Service container to see its components:
Components:
-
Payment Controller
-
Transaction Manager
-
Fraud Detection Service
-
Balance Calculator
-
Repository Layer
C4-PlantUML Code
@startuml
!include https://raw.githubusercontent.com/plantuml-stdlib/C4-PlantUML/master/C4_Component.puml

title PayQuick - Payment Service Component Diagram

!define C4ShapeInRow 4
!define C4BoundaryInRow 1

Container_Boundary(payment_service, "Payment Service") {
    Component(payment_controller, "PaymentController", "Spring REST Controller", "Handles incoming payment requests")
    Component(transaction_manager, "TransactionManager", "Spring Service", "Orchestrates payment workflows")
    Component(fraud_detector, "FraudDetectionService", "Spring Service", "Validates transactions for fraud")
    Component(balance_calculator, "BalanceCalculator", "Spring Service", "Calculates and updates account balances")
    Component(validation_service, "ValidationService", "Spring Service", "Validates payment data and business rules")

    ComponentDb(transaction_repo, "TransactionRepository", "Spring Data JPA", "Stores transaction records")
    ComponentDb(account_repo, "AccountRepository", "Spring Data JPA", "Manages account data")
    ComponentDb(fraud_repo, "FraudRulesRepository", "Spring Data JPA", "Stores fraud detection rules")

    Component(notification_client, "NotificationClient", "Feign Client", "Calls notification service")
    Component(bank_client, "BankingClient", "Feign Client", "Integrates with external banking API")
}

Rel(payment_controller, transaction_manager, "Forwards payment requests to")
Rel(transaction_manager, fraud_detector, "Validates transaction with")
Rel(transaction_manager, validation_service, "Validates data with")
Rel(transaction_manager, balance_calculator, "Updates balances via")
Rel(transaction_manager, transaction_repo, "Saves transactions to")
Rel(balance_calculator, account_repo, "Reads/writes account data to")
Rel(fraud_detector, fraud_repo, "Checks rules against")
Rel(transaction_manager, notification_client, "Sends notifications via")
Rel(transaction_manager, bank_client, "Processes external transfers via")

@enduml
Visual Paradigm Tip
Use Component Diagram Templates in Visual Paradigm to quickly scaffold component structures. The AI can suggest common patterns like Repository, Service Layer, and Controller based on your container type.
💻 Level 4: Code Diagram (Optional)
What It Shows
Actual classes, interfaces, and methods.
Example: FraudDetectionService Class
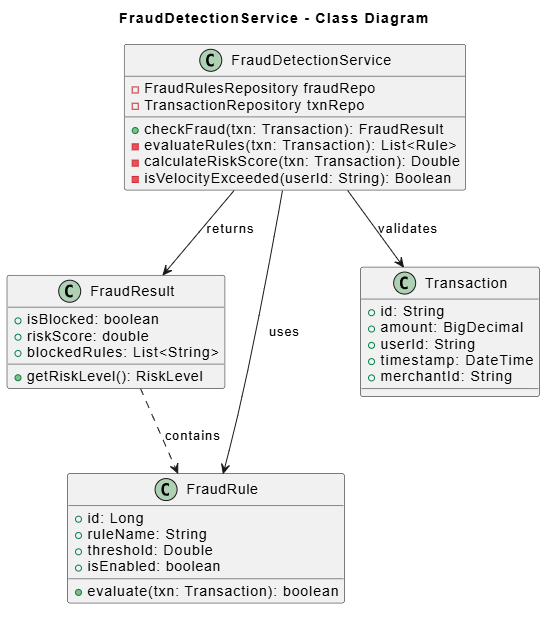
@startuml
title FraudDetectionService - Class Diagram

class FraudDetectionService {
    - FraudRulesRepository fraudRepo
    - TransactionRepository txnRepo
    + checkFraud(txn: Transaction): FraudResult
    - evaluateRules(txn: Transaction): List<Rule>
    - calculateRiskScore(txn: Transaction): Double
    - isVelocityExceeded(userId: String): Boolean
}

class FraudResult {
    + isBlocked: boolean
    + riskScore: double
    + blockedRules: List<String>
    + getRiskLevel(): RiskLevel
}

class FraudRule {
    + id: Long
    + ruleName: String
    + threshold: Double
    + isEnabled: boolean
    + evaluate(txn: Transaction): boolean
}

class Transaction {
    + id: String
    + amount: BigDecimal
    + userId: String
    + timestamp: DateTime
    + merchantId: String
}

FraudDetectionService --> FraudResult : returns
FraudDetectionService --> FraudRule : uses
FraudDetectionService --> Transaction : validates
FraudResult ..> FraudRule : contains

@enduml
Note: Level 4 diagrams are best auto-generated from code using tools like:
-
Visual Paradigm’s Code Engineering features
-
IntelliJ IDEA’s built-in diagram generator
-
Swagger/OpenAPI for API documentation
🛠️ Recommended Tooling: Visual Paradigm + AI Features
Why Visual Paradigm?
Visual Paradigm is a comprehensive modeling tool that supports C4 diagrams natively and offers powerful AI-assisted features:
Key Features for C4 Modeling:
-
AI-Powered Diagram Generation
-
Describe your system in plain English
-
AI suggests appropriate C4 level diagrams
-
Auto-generates initial structure
-
-
Smart Layout Engine
-
Automatic arrangement of components
-
Intelligent connector routing
-
Consistent styling across diagrams
-
-
Code Engineering
-
Reverse engineer code to diagrams (Level 4)
-
Forward engineer diagrams to code skeletons
-
Keep diagrams synchronized with codebase
-
-
Collaboration Features
-
Real-time team collaboration
-
Version control integration
-
Export to multiple formats (PNG, PDF, SVG)
-
-
C4 Model Templates
-
Pre-built templates for each C4 level
-
Industry-specific examples
-
Best practice guidelines built-in
-
Getting Started with Visual Paradigm:
-
Download the Community Edition (free) or Enterprise Edition
-
Install the C4 Model plugin from the marketplace
-
Create your first diagram using the wizard
-
Use AI Assistant by clicking the magic wand icon
-
Export and share with your team
🚀 Best Practices for Beginners
1. Start Simple, Then Iterate
-
Begin with Level 1 even if it feels too basic
-
Get stakeholder buy-in before diving deeper
-
Add detail progressively based on need
2. Keep Diagrams Current
-
Update Level 1-2 diagrams with each major release
-
Automate Level 4 generation where possible
-
Archive outdated diagrams, don’t delete them
3. Name Things Clearly
Use the format: Name [Technology] – Description
✅ Good: Payment Service [Spring Boot] - Processes payment transactions
❌ Bad: PaymentService or The payment thing
4. Choose the Right Level for Your Audience
| Audience | Recommended Level |
|---|---|
| Executives/Clients | Level 1 only |
| Product Managers | Levels 1-2 |
| DevOps/Infrastructure | Levels 2-3 |
| Developers | Levels 2-4 |
5. Use Consistent Visual Language
-
Stick to C4 color conventions
-
Use consistent shapes for similar elements
-
Maintain arrow styles for relationship types
📊 Complete Example: Mapping User Journey Across Levels
Let’s trace a “Send Money” feature across all C4 levels:
Level 1 (Context): Customer → PayQuick → Banking Network
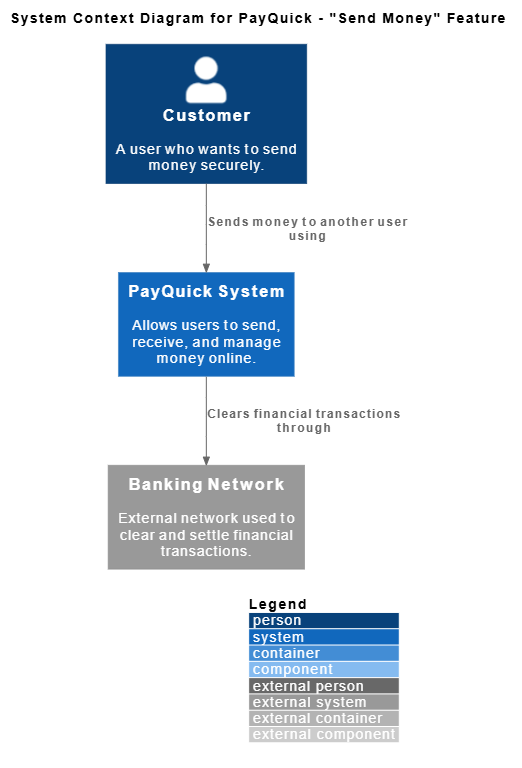
Level 2 (Containers): Mobile App → API Gateway → Payment Service → Database → Bank API
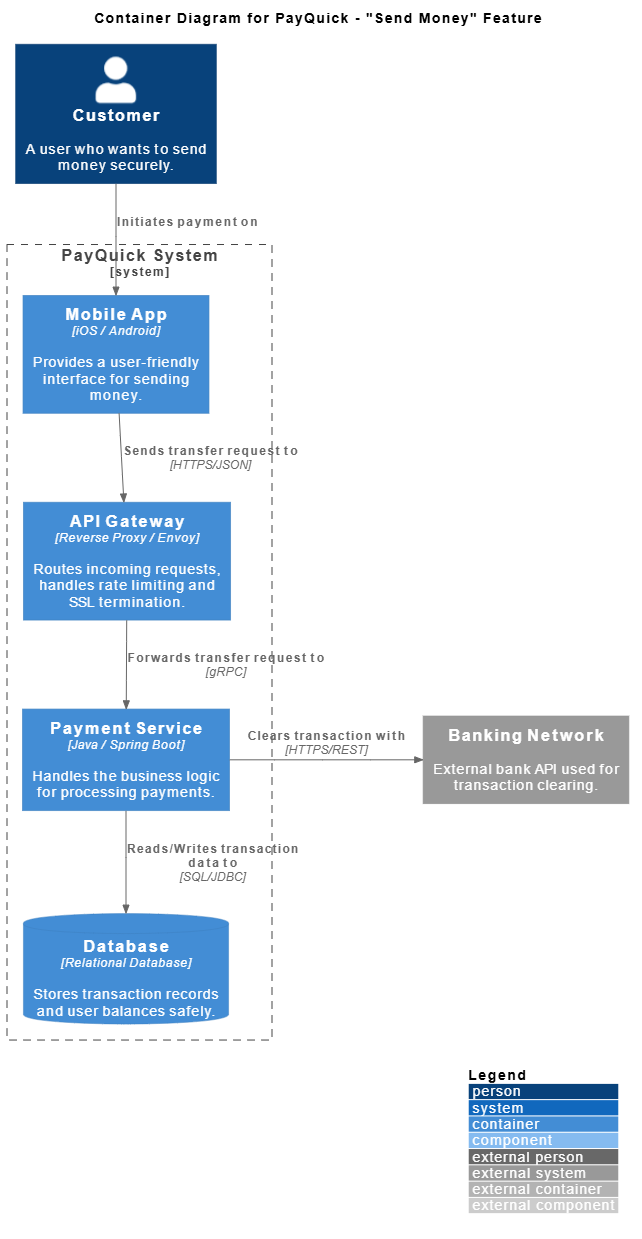
Level 3 (Components): PaymentController → TransactionManager → FraudDetection → BalanceCalculator → TransactionRepository
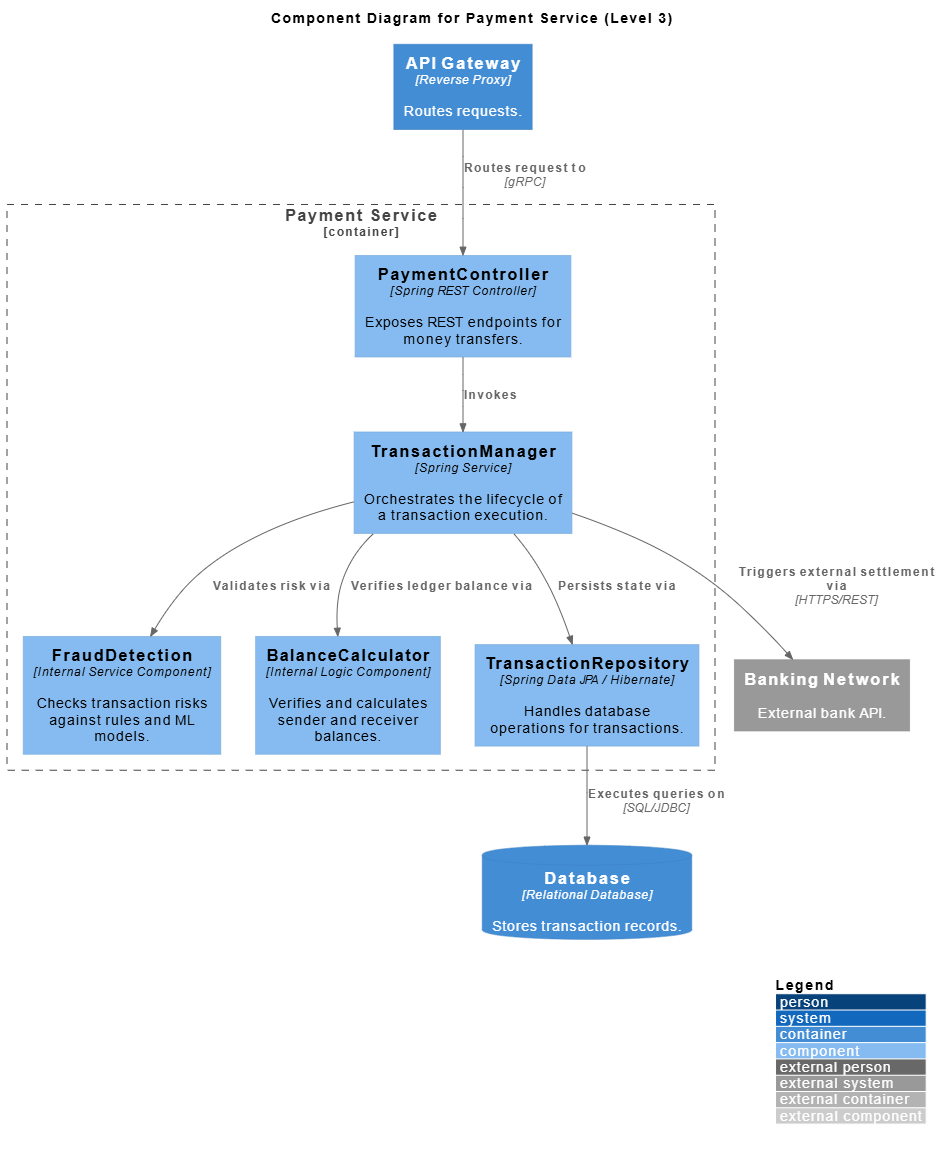
Level 4 (Code): PaymentController.transfer() → TransactionManager.process() → FraudDetection.checkFraud()
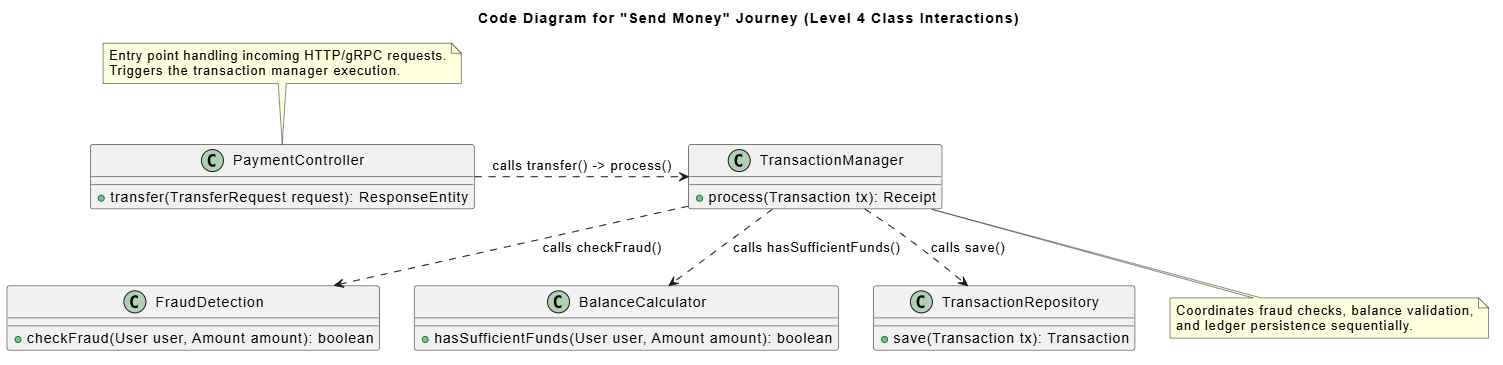
This hierarchical approach helps different team members understand the system at their appropriate level of detail.
🎓 Conclusion
The C4 model transforms software architecture from an intimidating, abstract concept into a practical, navigable map. By starting with the big picture and progressively zooming in, you create documentation that serves everyone from CTOs to junior developers.
Key Takeaways:
✅ Level 1 sets the stage—never skip it, even for technical audiences
✅ Level 2 reveals your technology stack and deployment strategy
✅ Level 3 shows how you’ve organized code within services
✅ Level 4 is optional—automate it when possible
✅ Visual Paradigm and similar tools with AI features can accelerate diagram creation by 50-70%
✅ Living documentation is better than perfect documentation—update iteratively
Remember: The goal isn’t to create beautiful diagrams for their own sake. It’s to facilitate communication, reduce onboarding time, and make better architectural decisions. Start with a simple System Context diagram today, and watch your team’s understanding—and productivity—grow.
Your Next Steps:
-
Pick one of your current projects
-
Sketch a Level 1 diagram on paper or whiteboard
-
Translate it to C4-PlantUML or Visual Paradigm
-
Share it with a non-technical stakeholder for feedback
-
Gradually add Level 2 details as needed
Happy diagramming! 🎨
This post is also available in Deutsche, Español, فارسی, Français, English, Bahasa Indonesia, 日本語, Polski, Portuguese, Ру́сский, Việt Nam, 简体中文 and 繁體中文.
